| Introduction | User's Guide | Concepts |
Since the User's Manual is quite incomplete and even a bit outdated, here is a quick guide to the main features of Sketch.
There's not much to say about the main window, since many of its components are fairly standard, like the menu and toolbar.
The status bar at the bottom indicates the current mode, the current magnification factor, the current position of the mouse pointer (you can change the unit from the context menu) and some information about the current selection.
The palette just above the status bar allows you to easily assign a fill color (click the left mouse button) or a line color (middle mouse button). It also has an experimental Drag&Drop facility: click on a color and drag the color to the pattern window in the fill dialog or onto a color button.
Here's a brief description of some menu commands. If the command is also available as a button in the toolbar, the icon is also shown.
Some commands are accessible via key strokes. The key sequence is indicated in the menu. The notation for key strokes is described in the section on key strokes.
Load a file into Sketch. Sketch tries to determine the file type automatically. It recognizes its own format, XFig, Adobe Illustrator, CMX (an exchange format defined by Corel), SVG (the upcoming web-standard for vector graphics) and WMF files.
The filters for the 'foreign' formats are not complete. The XFig filter for instance has some problems with the ordering of objects (because of that awful `depth' feature) and ignores arrow heads and dashing.
Insert the contents of a document as a group into the current document.
Save the current file. If it was read from an SK-file (Sketch's own format) it is saved under the same name after Sketch has created a backup file. If it was not read from a file or the file was not an SK-file, you have to specify a filename. Sketch can currently save SK-files and Illustrator files.
Save the current drawing into a PostScript file. The file conforms to the EPS specification (I hope).
Switch to one of Sketch's major modes, edit mode and selection mode.
Sketch allows you to undo every operation and maintains a virtually unlimited undo history. If you really want to limit the undo history, you can do so from the preferences dialog (File/Options...).
Delete the current object.
Create a duplicate of the current object just above the current object and select it. The duplicate is slightly offset. You can set the duplication offset in the preferences dialog.
Flip the current object(s) horizontally (vertically)
Some objects have an intrinsic geometry, like text objects, where the geometry is defined by the font and the font size, and bitmap images or EPS files. Any transformations (rotations, reflections, ...) later applied are stored in the object. Remove Transformation reverts these objects to their natural size and orientation.
Move the current object to the top of its layer.
Move the current object to the bottom of its layer.
Swap the current object and the next higher one.
Swap the current object and the next lower one.
Replace the currently selected objects with a group containing these objects and select it.
Grouped objects are usually manipulated as a whole, but if needed, you can select individual objects with the mouse or keyboard.
Replace the currently selected group with the objects it contains and select them.
While Group creates only normal groups, this command can ungroup other special groups such as blend groups or mask groups as well.
After invoking the zoom command you can either
Convert the current object to a bézier object. This works for béziers :-), rectangles, ellipses and text. (To convert text to béziers, Sketch must have access to the appropriate type1 font file (either .pfa or pfb)).
Turns the grid on (or off, if it's on). If gridding is on, objects will snap to grid points when they are edited.
This command doesn't affect the visibility of the grid. The visibility is controlled via the layer dialog. The grid is a special layer which is usually called "Grid".
If snapping to objects is active, dragged objects snap to the nearest special point of any other visible object. Special points are the nodes of a bézier curve or the corners of a rectangle.
If snapping to guide lines is active, dragged objects snap to the nearest guide line or other objects on the guide layer.
This command doesn't affect the visibility of the guide lines. The visibility can be controlled from the layer dialog. The guide layer is usually called "Guide Lines".
Create a Rectangle by pressing the left mouse button and dragging the mouse. One corner of the newly created rectangle is where the button was pressed, the other where it was released. Holding <Ctrl> while dragging creates a square, holding <Shift> creates a rectangle or square centered on the starting point.
In edit mode, you can drag the corners of a rectangle to create rounded corners.
Create an Ellipse by pressing the left mouse button and dragging the mouse. Holding <Ctrl> while dragging creates a circle, holding <Shift> creates a ellipse or circle centered on the starting point.
In edit mode, you can drag the handle of an ellipse to create arcs.
Create a Bézier curve. This requires at least two click-drag-release cycles. The first cycle defines the start point of the curve and its tangent. The next cycles define the rest of the points and tangents in the same fashion. Click <Button2> or press Space to finish.
Create a polygon. The first click-drag-release cycle defines the first line segment. The next cycles define the rest of the segments. Click <Button2> or press Space to finish. The object created is actually a Bézier curve consisting only of straight lines.
Create a text object by clicking where you want the text to be and type. If you click and drag you create rotated text.
This command opens a dialog box to let you specify the image file. After selecting the file, place the image on the page by clicking at the desired position. A dashed rectangle indicates the size and position.
Sketch can load any image the Python Imaging Library (PIL) can read. EPS files are not read by the PIL, they are imported and printed unmodified. Sketch uses Ghostscript to render a preview image, so an EPS file looks like an ordinary bitmap image on the screen.
The notation of key strokes used in this manual and in the menus is very similar to the one used in GNU-Emacs:
| Notation | Meaning |
|---|---|
| Space | space |
| Right, Left, Up, Down | The cursor keys |
| Prev, Next, Home, End | |
| <Shift> <Ctrl> <Meta> | The modifier keys Shift Control and Meta (which may be the Alt key) |
| <Button1> | The left mouse button |
| <Button2> | The middle mouse button |
| <Button3> | The left mouse button |
| C-d | <Ctrl> and lowercase "d", similarly S- for <Shift> and M- for <Meta> |
Unless otherwise noted, "Clicking" means a click with the left mouse button.
Most of the time, Sketch is on one of two major modes: Selection Mode or Edit Mode. You can switch between these modes with Space or the toolbar.
In selection mode, you can select objects and move and transform them as a whole with the mouse. Most commands operate on the currently selected objects (see also Mouse And keyboard). In edit mode, you can edit individual aspects of an object, like the nodes of a bézier curve or the text of a text object.
Sometimes, Sketch is in a temporary minor mode, for instance when selecting a region for zooming, or when creating an object.
To select...
Click on it. It will become the new currently selected object.
Click S-<Button1> on an object to add it to the selected objects.
Click C-<Button1> on an object to deselect it.
You can also select multiple objects by rubberbanding. Click and drag <Button1>, all objects in the dashed rectangle will be selected. Again, holding <Shift> or <Ctrl> add or deselect the indicated objects.
You can also use the cursor keys to navigate through the object hierarchy:
| M-Right | Select the next (higher) object |
| M-Left | Select the previous (next lower) object |
| M-Down | Select the first child (sub-object) of the current object |
| M-Up | Select the parent of the current object (if the current object is a sub-object) |
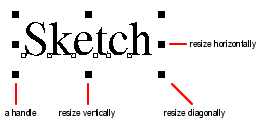
If you're in selection mode and you've just selected an object, Sketch indicates this with 8 rectangular handles around the object:

Clicking on a handle and dragging it will resize the object. Just clicking on the object and dragging the object, moves the object. Holding <Ctrl> while dragging constrains the resize and move operations.
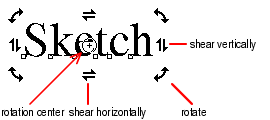
A single click (and no drag) on the object switches to transformation mode:

Another single click switches back to the resize mode.
Sketch currently has three special effects groups:
To create a blend group:
If you later edit one of the control objects, the blend group will be updated automatically.
For optimal results, the objects should have a similar structure: bézier curves with the same number of nodes, groups with the same number of sub objects, etc.
To create a blend group with more than two control objects, select the start or end object of an existing blend group and the new control object and press apply in the blend panel.
It's a little awkward to change the number of steps in an interpolation with the blend panel if the blend group has more than two control objects (and therefore more than one interpolation). In that case, you have to select the interpolation itself by holding <Ctrl> and <Shift> while clicking on it.
A mask group is a special group where one object defines a clip mask for the rest of the group. If this object is e.g. an ellipse, all that is drawn of the other objects are the parts that overlap the ellipse.
To create a mask group
Note: The topmost of the selected objects will become the mask, regardless of the order in which you select them. (In versions prior to 0.5.3 it was the lowest object)
If you want to edit the mask you can select it via the context menu (<Button3>).
The mask has to be a rectangle, an ellipse, a bézier curve or an image.
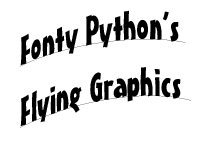
In Sketch, you can align text along a curve:
 |
 |
| Text on a path can have either rotated letters (left) or skewed letters (right). | |
To create this
To edit either the text object or the curve individually, select it via the context menu if the whole group is selected.
This way, you can hide the curves by assigning empty fill and line patterns.
| Introduction | User's Guide | Concepts |